Note - This tutorial is also answer to How to get alexa page ranks for blogger or website ?


Alexa is the global leader in Analytics.It is also leading provider of free, global web metrics. Search Alexa to discover the most successful sites on the web by keyword, category, or country. Use our analytics for competitive analysis, benchmarking, market research, or business development. You can also use Alexa's Pro tools to optimize your blog's presence on the web.Alexa also helps to determine your blog improvement through it charts.I also add this blog to alexa and now page rank of btsnts is 17,64,265 and it is improving day to day.
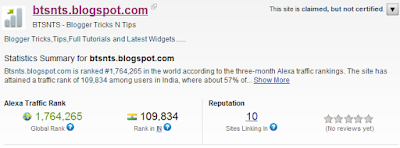


How To Get Alexa Page Rank For Your Blog ?


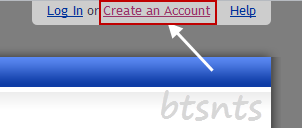
I am giving a full image tutorial so that you can easily understand it


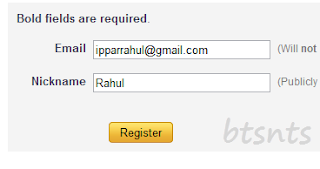
  • Fill  the short form.


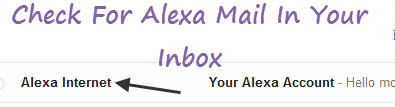
  • Now go to your inbox and search for confirmation message from alexa and click on provided link.
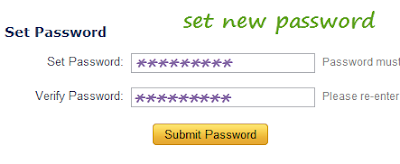
  • Now you will redirect to password page.Type the password for two times and hit submit password.

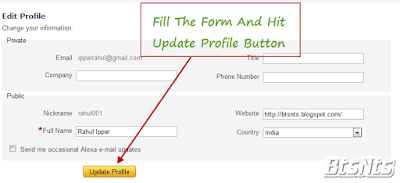
  • Now fill about your profile then hit update the profile.

  • Now go to your Dashboard at left site.


  • Click Add A Site Button at right bottom.

  • Now select your plan.I recommend Free Plan.


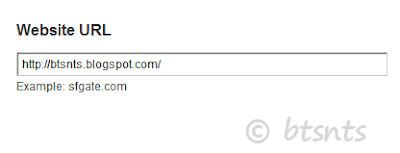
  • Now enter your blog/websites URL.


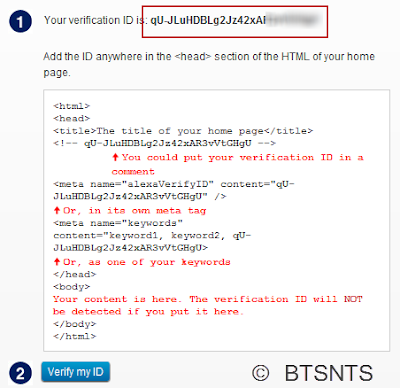
  • Then copy the full code carefully.


  • Now open a new tab.
  • Go to Blogger Dashboard >  Design > Edit HTML.
  • Now find <head> tag.
  • Put the copied code just below or after <head> tag.
  • Then again goes to alexa and hit Verify my ID button.
You done it.
You can also check your pagerank @

http://www.alexa.com/siteinfo/YOUR BLOG/SITE URL. 

*Not need to wright WWW. or HTTP://
Meta tags are very important element of Search Engine Optimization (SEO). Meta descriptions and Meta keywords play a big role on OnSite SEO to get higher ranking in search engine result page (SERP).
Few days ago there was a big problem for writer who used Google’s blogger platform for blogging. Because there was no easy way to add Meta description in blog posts. But Blogger platform has now  been updated and now we can easily add Meta description in every blog posts we want.
Let’s see How to add Meta description to blogger blog posts
  •  Login to your blogger account.
  • Go to Setting > Search preferences.

  • Then click on Edit link in Meta tags > Description.

  • Select "Yes" option and write description for your Homepage and click on save.


 Now click New Posts. See the screenshot below.
How to add Meta description to blogger2. Now input your unique title and content with necessary images and videos. Write the content focusing your researched keyword and targeting audience.
3. Now it’s time to add Meta description in your blog post that will show in SERP. Please click on Search Description from right side and input your 160 words Meta description. Remember, it should be under 160 words, because search engine only show 160 words in the SERP.
It will help you to get more value to Google and audience will easily understand what the article is about. Please see the screenshot below to get crystal clear instruction.
How to add Meta description to blogger


In order to keeping busy visitors on our blogs finally we got the plugin which we have been waiting from long time,recently facebook has launched their "Recommendation Bar" in beta version,the Recommendation Bar is a plugin which shows a number of some recommended articles for your readers or visitors and you can set number of recommended articles,when any visitor visits to your any post,after some specific time the plugin pop ups at the right/left corner of your blog with the recommended articles,thats why its helps you to keep busy your visitors on your blog.The plugin contains title of your post,thumbnail and number of likes just below of that post and the plugin shows the only those articles which are previously liked or shared on facebook.If you want more such plugins then I am listing some similar widgets and plugins -

Now lets see how to add facebook recommendations bar to blogger?

How To Add Facebook Recommendations Bar To Blogger?


For better understanding I am dividing this post in two parts and they are as below,


  1. Creating new Facebook App
  2. Adding Facebook Recommendations Bar To Blogger

Part 1 : Creating new Facebook App

To create Facebook app for your Recommendation Bar follow below steps,
  • First go to Facebook Apps and login with your Facebook account
  • Click on Create New App button at top right corner

  • As soon as you hit Create New App button a pop up box will appear.In App Name field fill Recommend Bar and keep all it is and hit Continue button.
Click On Image To Enlarge

  • Enter the captcha as shown in image and hit Submit button

  • Now you will redirect to an another page.Scroll down and click on Website with Facebook Login tab and inside the box input your blog URL.Now leave all fields as it is and click Save Changes
Click On Image To Enlarge


  • Now copy your App ID and paste it into notepad,we will need it later.


Great,you have created your App.Now lets see how to add Recommendations Bar to blogger.

Part 2 : Adding Facebook Recommendations Bar To Blogger


  1. Go to Blogger Dashboard > Template
  2. Download a copy of your template
  3. Click on Edit HTML
  4. Hit Proceed button
  5. Now search for below code in your template


<html

replace it with below code,
<html xmlns:fb='http://ogp.me/ns/fb#'


Now find for below code,
<body>


just below of it paste following code,

Note - If you are using default blogger templates then search for <body tag instead of above code.
<div id='fb-root'/> 
<script>
//Facebook Recommendation bar by http://fastbloggerhack.blogspot.com/
//this notice must stay intact for legal use
//For more visit http://
fastbloggerhack.blogspot.com/
//<![CDATA[
(function(d, s, id) {
var js, fjs = d.getElementsByTagName(s)[0];
if (d.getElementById(id)) return;
js = d.createElement(s); js.id = id;
js.src = "//connect.facebook.net/en_US/all.js#xfbml=1&appId=YOUR APP ID HERE";
fjs.parentNode.insertBefore(js, fjs);
}(document, 'script', 'facebook-jssdk'));
//]]>
</script>
<b:if cond='data:blog.pageType == &quot;item&quot;'><b:if cond='data:blog.pageType != &quot;static_page&quot;'><div style='z-index:999999; position:absolute;'>
<fb:recommendations-bar action='like' max_age='0' num_recommendations='3' read_time='10' side='right' site='http://
fastbloggerhack.blogspot.com/' trigger='40%'/></div>
</b:if></b:if>


  • Replace APP ID HERE with your APP ID which you have created in first part
  • Replace http://fastbloggerhack.blogspot.com/ with your blog URL.
  • The widget will only appear on post pages and not on homepage or static pages. To display it on all pages, then simply delete the lines in red color.
  • If you want to change number of recommendations then simply change the value 3
  • If you don't want to show your old articles then edit the value max_age='0',you can set it to 1-180.But if you don't want to take age into account then let it be 0 as default.
  • If you want to change position of bar to right to left then simply replace right with left. 
  • When any visitor comes to your blog,after specific time the bar expand.I have set the time to 10 seconds to chnage it just change value 10.
Finally save your template and visit your post pages.


Now days concept scrolling bar or sticky bar has becomes very popular because of their attention grabbing capacity,they quickly catches any ones attention on them that's why I am also using a sticky bar(hellobar) on my blog.Today I am gonna to share a cool scrolling sticky bar which contains many subscription/sharing options such as twitter tweet button,google +1 button,facebook like button,email subscription form also it contains a random post button which will redirect you to another(any random) post.This sticky will sticks to upper part of page and only visible when scroll down.Now lets get started and see how to add this sticky bar to blogger blog.To add to sticky bar I will recommend you to use old blogger user interface because as per widget author it throws an unexpected error,you can switch back to old blogger interface by clicking on the Settings Wheel icon at top right of your new blogger dashboard.

Click On Image To Enlarge

How To Add Scrolling Sticky Bar To Blogger?


Step 1 : Adding The HTML


  1. Go to Blogger Dashboard > Template
  2. Download a copy of your template
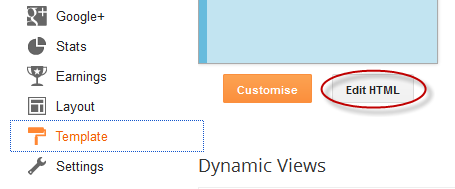
  3. Click on Edit HTML
  4. Hit Proceed
  5. Find for below code,
<body>


Note - If you are using default blogger templates then search for <body tag.Watch video below for exact information.

add below code just below of above code,
<div id='HB-Bar-Container'>
<div id='HB-Bar-Content'>
<ul id='HB-Bar-Left'>
<li class='Home'> <a href='http://fastbloggerhack.blogspot.com/'>Home</a> </li>
<li class='Share'> <div id='share-top'>
<ul>
<li> <a class='twitter-share-button' data-count='horizontal' href='http://twitter.com/share'>Tweet</a> </li>
<li> <g:plusone size='medium'></g:plusone> </li>
<li> <div class='fb-like' data-font='verdana' data-layout='button_count' data-send='false' data-show-faces='false'>
</div></li></ul>
<div style='clear:both;'></div></div></li>
</ul>
<ul id='HB-Bar-Right'>
<li class='Subscribe'> <div class='HB-email'>
<form action='http://feedburner.google.com/fb/a/mailverify' method='post' onsubmit='window.open(&#39;http://feedburner.google.com/fb/a/mailverify?uri=HBlogger&#39;, &#39;popupwindow&#39;, &#39;scrollbars=yes,width=550,height=520&#39;);return true' style='padding:3px;text-align:center;' target='popupwindow'>
<input class='textarea' gtbfieldid='3' name='email' onblur='if (this.value == "") {this.value = "";}' onfocus='if (this.value == "") {this.value = "";}' placeholder=' Enter Your Email Address :)' type='text' value=''/> <input name='uri' type='hidden' value='HBlogger'/><input name='loc' type='hidden' value='en_US'/> <input class='HB-emailsubmit' type='submit' value='Subscribe'/> </form>
<a href="http://fastbloggerhack.blaogspot.com/" title="Blogger Widgets" ><img src="http://img1.blogblog.com/img/blank.gif" /></a> </div></li>
<li class='btt'> <a href='#top' title='Back to top'>Slide to Top &#8593;</a> </li>
</ul></div></div>

  • Line No. 4 : Replace http://fastbloggerhack.blaogspot.com/ with your blog URL.
  • Line No. 16,16 : Replace HBlogger with your feedburner username.

Step 2 : Adding The Scripts


Now find for below code,
</body>


add below code just before/above it,
<script src='http://ajax.googleapis.com/ajax/libs/jquery/1/jquery.min.js' type='text/javascript'></script> 
<script>
//<![CDATA[
var b = $("#HB-Bar-Container");var c = b.css("top");$(window).scroll(function (){if ($(this).scrollTop() > 50){b.stop().animate({top: "0px"}, 0)}else{b.stop().animate({top: "-100px"}, 0)}});
//]]>
</script>
<script>
$(document).ready(function(){// fade in .btt
$(function () {$(window).scroll(function (){});// scroll body to 0px on click
$('.btt a').click(function () {$('body,html').animate({scrollTop: 0}, 350);return false;});});});
</script>
<script>(function(d, s, id) {var js, fjs = d.getElementsByTagName(s)[0];if (d.getElementById(id)) return;js = d.createElement(s); js.id = id;js.src = "//connect.facebook.net/en_US/all.js#xfbml=1";fjs.parentNode.insertBefore(js, fjs)}(document, 'script', 'facebook-jssdk'));</script>
<script src='http://apis.google.com/js/plusone.js' type='text/javascript'></script>
<script src='http://platform.twitter.com/widgets.js' type='text/javascript'></script>


Step 3 : Adding The Bar Styles


Now find for
]]></b:skin>

add below code just above it,
#HB-Bar-Container {
background-color:#f6f6f6;
background: -webkit-gradient(linear, 0% 40%, 0% 70%, from(#f9f9f9), to(#f1f1f1));
background: -moz-linear-gradient(linear, 0% 40%, 0% 70%, from(#f9f9f9), to(#f1f1f1));
}

#HB-Bar-Container , #HB-Bar-Left .Home a, #HB-Bar-Right .btt a,.HB-emailsubmit {
box-shadow: 0 5px 5px -5px #999;
-webkit-box-shadow: 0 5px 5px -5px #999;
-moz-box-shadow: 0 5px 5px -5px #999;
}

#HB-Bar-Container{
margin: 0px 116px;
top:-100px;
-moz-border-radius:0px 0px 10px 10px;
-webkit-border-radius:0px 0px 10px 10px;
border-radius: 0px 0px 10px 10px;
text-align:center;
border-bottom: 1px solid #aaa;
z-index:999;
padding:4px;
height:33px;
position:fixed;
vertical-align: baseline;
}

#HB-Bar-Container *{
padding:0;
}

#HB-Bar-Container a {
text-decoration:none;
}

#HB-Bar-Content{
width:1024px;
margin:0 auto;
}

#HB-Bar-Content li{
list-style:none;
float:left;
}

#HB-Bar-Left{
float:left;
width:45%;
}

#HB-Bar-Right{
float:right;
width55%;
}

#HB-Bar-Left li{
margin-right:1%;
margin-top:-7px;
}

#HB-Bar-Right li{
margin-top:-7px;
}

#HB-Bar-Left .Home a, #HB-Bar-Right .btt a,.HB-emailsubmit{
font-size:9pt;
font-family:cambria;
font-weight:Bold;
text-transform:uppercase;
color:#fff;
text-shadow:0 -1px 1px rgba(0,0,0,0.25);
letter-spacing: 1px;
padding:6px;
border-radius:3px;
-moz-border-radius:3px;
-webkit-border-radius:3px;
}

#HB-Bar-Left .Home a:active, #HB-Bar-Right .btt a:active,.HB-emailsubmit:active{
position: relative;
top: 1px;
box-shadow:none;
}

#HB-Bar-Left .Home a{
background:#143eb4;
}

#HB-Bar-Left .Home a:hover{
background:#1556fa;
}

#HB-Bar-Right .Subscribe{
margin-top:-14px;
}


#HB-Bar-Right .btt a{
background:#00810b;
margin-left:3px;
}

#HB-Bar-Right .btt a:hover{
background:#06b421;
}

.HB-emailsubmit{
background:#ce1527;
cursor:pointer;
border:none;
height:26px;
width:90px;
}
.HB-emailsubmit:hover{
background: #f02a37;
}
.textarea{
border:1px solid #aaaaaa;
-moz-border-radius:3px;
-webkit-border-radius:3px;
border-radius:3px;
resize:none;
font-size:8pt;
font-family:verdana;
width:170px;
height:25px;
color:#000000;
}

#share-top{
background: #f9f9f9;
border:1px solid #dddddd;
line-height: 1;
margin: -4px 0 0 60px;
padding: 10px 0 2px 5px;
-moz-border-radius:3px;
-webkit-border-radius:3px;
border-radius:3px;
}

#share-top li {
display: block;
margin-right: 0;
}

#facebook-widget,#google-widget,#twitter-widget {display:none; }
@media only screen and (min-width : 768px) and (max-width : 1050px),only screen and (min-device-width : 768px) and (max-device-width : 1024px){
#HB-Bar-Container{
display:none;
}
}

Finally save your template and visit your blog.


Today I am sharing an amazing slide out social sharing widget,when any user hovers on this widget it slide out with some social networking button such as twitter,facebook,print,email and add this button which contains share option for almost all social sharing sites.This widget floats to below right corner of the page and scrolls along with page which allow a real time sharing option for your visitors,this widget is created by addthis and bloggerized by us.Now lets go to the tutorial and see how to add this widget to blogger blog.


How To Add This Widget To Blogger?

The installation of this widget is damn easy,you can add this widget in two steps.

  1. Go to Blogger Dashboard > Template
  2. Click On Edit HTML
  3. Hit Proceed button
  4. Find For Below Code,

</head>


add below code just above it,
<script type="text/javascript" src="http://s7.addthis.com/js/300/addthis_widget.js"></script>


Now find for below code
</body>


add below code just before/above it,

<!-- fastbloggerhack.blogspot.com slideout widget : BEGIN -->
<div class="addthis_toolbox addthis_peekaboo_style addthis_default_style addthis_label_style addthis_32x32_style">
<a class="addthis_button_more">Share</a>
<ul>
<li><a class="addthis_button_preferred_1"></a></li>
<li><a class="addthis_button_preferred_2"></a></li>
<li><a class="addthis_button_preferred_3"></a></li>
<li><a class="addthis_button_preferred_4"></a></li>
</ul>
</div>
<!-- fastbloggerhack.blogspot.com slideout widget : END -->


Finally save your widget and you are done :)
This is also nice hack for comment system in blogger.
When we allow anonymous comment, everyone can
comment your post without using any Google account.
As a result of it. there are no way to provide diffrent
avatar for commentators.So , bloggers use a default
avatar for every anonymous  commentator.So, in this
Tutorial helps you to change that default avatar,
Follow these steps to add it to your blogger.
I will show you how to change or customize default avatar of anonymous commenters or Blogger users with no picture added on their profiles. After Blogger announced new feature of threaded comment, we can still customize it by adding a jQuery plugin to our template and replacing the default anonymous avatar found at this

URL http://img1.blogblog.com/img/anon36.png
and the one for blogger users http://img2.blogblog.com/img/b36-rounded.png

...with our own.


anonymous, default avatar, blogger blogspot

Step 1.

Go to Dashboard - Template - click on the Edit HTML button and then Proceed


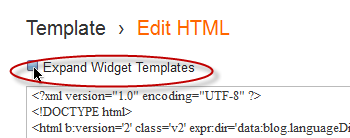
...then select Expand Widget Template (don't forget to make a backup)

Step 2. Find (CTRL + F) this code in your template:
</body>

Step 3. Add the following code just above it:
<script src='http://code.jquery.com/jquery-latest.js'/>
<script>
$(&quot;img[src=&#39;http://img1.blogblog.com/img/anon36.png&#39;]&quot;)
.attr(&#39;src&#39;, &#39;https://blogger.googleusercontent.com/img/b/R29vZ2xl/AVvXsEhtNDDBU7QS58pmHtBd1tLSTXsVXXRUqL6jKpDdBtQsGlktckhsdXAILd_364t5Mj-yXK6OV_lVTzBqoK8ARLWLOZeMmkz5i_NxOqn3Si0tUuaqdUhJ3Gxucsh3aD8U6p-c1TpUAtAe8gI/s1600/default_avatar.gif&#39;)
.ssyby(&#39;blank&#39;)
</script>
<script src='http://code.jquery.com/jquery-latest.js'/>
<script>
$(&quot;img[src=&#39;http://img2.blogblog.com/img/b36-rounded.png&#39;]&quot;)
.attr(&#39;src&#39;, &#39;https://blogger.googleusercontent.com/img/b/R29vZ2xl/AVvXsEhd4dZBf_AUI9N7lMpOMFa_BEi9eE1GGcfiNM7hn3_LgY0NxZMmJcwOPn_c91pVRMpWzOjc7boS2mVunOwN43iM4nBRex4EwPfcdnd6w9VG6n-_SCB2vFMYFMo1TQ9hg1Fik_kOgRho-p4/s1600/blogger-user.png&#39;)
.ssyby(&#39;blank&#39;)
</script>

Step 4. Save the Template

How to change avatar:

For Anonymous users: Replace the code in red with the url address of your image
For Blogger users: Replace the URL in blue with your own.

You can choose one from these below (copy the url address):

https://blogger.googleusercontent.com/img/b/R29vZ2xl/AVvXsEhtNDDBU7QS58pmHtBd1tLSTXsVXXRUqL6jKpDdBtQsGlktckhsdXAILd_364t5Mj-yXK6OV_lVTzBqoK8ARLWLOZeMmkz5i_NxOqn3Si0tUuaqdUhJ3Gxucsh3aD8U6p-c1TpUAtAe8gI/s200/default_avatar.gif


https://blogger.googleusercontent.com/img/b/R29vZ2xl/AVvXsEjLRwbKl3Ld6eF37GPmC8_LGhVorspgVztRlcE3clQu8Y3Z0NZf2FAmTqMcyNs8aBlXBjMCOAtelsR4S2YVEWe5kDi21XjS_JLgQRO60eRqgWV7X01EvkrHpi_r8-hHocpFIcJxIsSIToc/s1600/facebook.gif
https://blogger.googleusercontent.com/img/b/R29vZ2xl/AVvXsEhCbynBe1-279IYVPgVKjJjZaDcG2uIX6lpkVxsl3Ej78MMCxzgSwkasDlHx1FCAk21RpTTC_2Uoa7fT8DTx-ZwO7HWNQMEjjh2lAqX7j7NmHuN4FtAztzsCTj1PsqCjfdnxzm-sdLe3no/s1600/anonymous3.png


https://blogger.googleusercontent.com/img/b/R29vZ2xl/AVvXsEh4qclMZmE3lLaL6SVzxtHSW46fgHXKJkoLsqAF2L0EcaJWNK35mtSSNQv-UYZ1m-3Lu-JOXxPkLqXqsQM4JwuWpLeCc1tf6G9Aq7fak-ZKsuj9JPSVLGT4tCfaIp7to17cxH35Hx6uU03W/s1600/blogger-user.png

 To add a redirect system to your blogger site follow the method
Step 1. Log in to your dashboard--> layout- -> Edit HTML
Step 2.Scroll down to where you see <head> tag.
Step 3.Add below code into your template just after the <head> tag.

<meta content='5;url=http://www.YOUR-URL.com/' http-equiv='refresh'/> 

Step 4. replace www.YOUR-URL.COM  to your url which will be redirected.

It should Look Like This.
<head>

<meta content='5;url=http://www.YOUR-URL.com/' http-equiv='refresh'/>


Step 5.Click on Save Templates and you are done.


Now your blog traffic will be redirected to your new address.